Brickwork has a timeless aesthetic appeal, but many older properties have been covered with cement or lime render over the years. Homeowners often decide to restore the original look of exposed brick for architectural authenticity and improved breathability. Before starting such a project, it is essential to understand how to remove render from brick safely and effectively. This process requires careful planning, correct tools, and knowledge of masonry behavior to prevent structural damage.
Render removal is not merely a cosmetic task; it directly impacts the integrity of the brick substrate. Poor technique can lead to spalling, mortar joint erosion, or moisture ingress. Therefore, adopting a methodical and technically informed approach ensures long-term durability.
Understanding the composition of the existing render, whether cement-based or lime-based, determines the removal strategy. Cement renders are generally harder and more bonded to the brick surface, whereas lime renders are comparatively softer and easier to detach.
Understanding the Structure Before You Begin
Assessing Brick Condition
Before attempting to remove render from brick, conduct a detailed inspection. Identify cracks, bulging areas, hollow spots, and moisture staining. Tapping the surface lightly can help detect weak bonding areas. If bricks are already deteriorating, aggressive mechanical removal can worsen the condition.
Older properties often used softer clay bricks, which are more susceptible to damage during chiseling or grinding. In such cases, manual removal techniques are preferred over heavy power tools.
Identifying Render Type
Render composition significantly influences removal technique. Cement render typically requires mechanical intervention such as a hammer and bolster chisel or a masonry breaker. Lime render, on the other hand, can often be loosened using controlled hand tools and water softening methods.
Accurate identification reduces the risk of overcutting and ensures that the brick face remains intact.
Tools and Techniques for Safe Removal
Manual Removal Methods
For delicate masonry, manual techniques are often safest. Using a club hammer and cold chisel allows gradual separation of render layers. Work at a shallow angle to avoid gouging the brick face. When learning how to remove render from brick, patience is critical. Rushing increases the likelihood of surface damage.
Start from natural cracks or edges where the render bond is weakest. Remove small sections incrementally rather than attempting large areas at once.
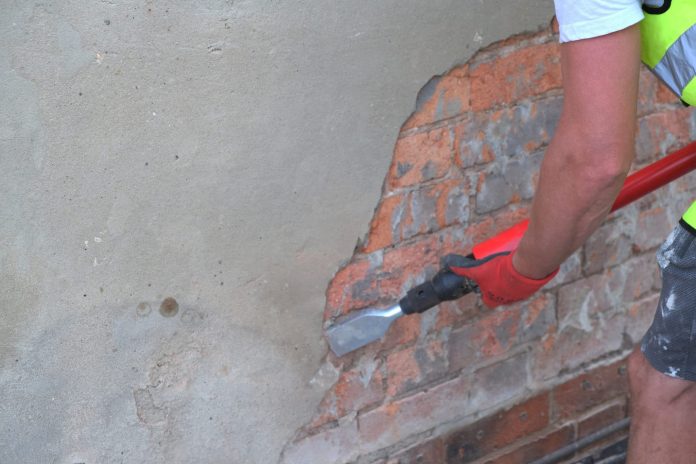
Mechanical Removal Methods
In cases where render adhesion is extremely strong, mechanical tools may be necessary. A low-impact SDS drill with a chisel attachment can speed up the process. However, pressure control is vital. Excessive force can chip brick corners and compromise mortar joints.
Dust control measures such as protective sheeting and vacuum extraction systems should be used. Masonry dust contains silica, which poses respiratory risks.
Chemical Softening Options
Some professionals apply mild masonry-safe solutions to weaken cement bonds before attempting removal. This method should only be used after confirming compatibility with the brick material.
Careful evaluation ensures the brick surface is not chemically stained or weakened during the attempt to remove render from brick.
Managing Risks and Preventing Damage
Protecting Mortar Joints
Mortar joints are often more vulnerable than bricks themselves. During render removal, joints may loosen or crumble. If this occurs, repointing with compatible mortar—preferably lime-based for older buildings—becomes necessary.
Maintaining mortar integrity preserves wall stability and moisture regulation capacity.
Avoiding Surface Spalling
Spalling occurs when the brick face flakes or chips away due to excessive mechanical stress. To prevent this while trying to remove render from brick, maintain consistent, controlled tool movement. Never strike directly perpendicular to the wall surface.
If spalling begins, stop immediately and reassess the technique. Sometimes partial render retention may be preferable if brick quality is poor.
Weather Considerations
Avoid removal during freezing temperatures or extreme heat. Thermal stress can exacerbate microfractures in exposed masonry. Ideal working conditions involve moderate, dry weather.
Finishing and Brick Restoration
Cleaning the Exposed Brick
Once render has been fully detached, the surface should be gently brushed to remove debris. Avoid high-pressure washing, as this can erode mortar joints. A mild masonry cleaner may be used for stubborn residues.
Cleaning enhances the natural texture and reveals the authentic character of the brickwork.
Repointing and Sealing
After successfully completing the process to remove render from brick, inspect mortar lines carefully. Repoint where necessary using breathable mortar. Avoid waterproof sealants unless specifically required, as brick needs permeability to manage moisture effectively.
In heritage properties, breathable finishes preserve structural longevity.
Optional Protective Treatments
Some homeowners apply breathable brick sealers to reduce staining and water absorption. However, ensure compatibility with the building’s age and environmental exposure conditions.
Proper finishing ensures the newly exposed brick maintains both structural strength and visual appeal.
Conclusion
Choosing to remove render from brick can dramatically enhance a property’s appearance and restore its architectural authenticity. However, the process demands technical awareness, proper tools, and careful execution. From identifying render type to managing mortar preservation and finishing treatments, each step contributes to a successful outcome.
When performed correctly, removing render reveals durable, breathable brickwork that can last for decades. Whether undertaken as a DIY project or by professional masons, the key lies in patience and precision. Ultimately, understanding how to remove render from brick safely ensures both aesthetic improvement and long-term structural integrity.
Frequently Asked Questions (FAQs)
1. Is it safe to remove render from brick without professional help?
Yes, but only if you understand the brick type and use controlled, low-impact tools to avoid structural damage.
2. How do I know if the brick underneath is in good condition?
You should inspect for cracks, softness, damp patches, and loose mortar before starting the removal process.
3. What tools are best to remove render from brick safely?
A hammer and cold chisel are safest for manual work; low-impact SDS drills may be used cautiously.
4. Can removing render damage older bricks?
Yes, especially soft clay bricks. Excessive force can cause spalling or weaken mortar joints.
5. Do I need to repoint after removing render?
Often yes. Mortar joints may require repointing to maintain wall stability and moisture resistance.
6. Should I seal the bricks after render removal?
Only use breathable sealers if necessary. Non-breathable coatings can trap moisture and cause long-term damage.